It's hard to know where to begin. I'm a nut for notions and gadgets! And if they're little, well that just makes it all the better!! Love little things.
 |
| Diagram 1 |
Let's start with the simple things. Make Velcro your best friend! There are all sorts of Velcro, or the generic term: Hook and Loop. (Diagram 1) It comes in all shapes and sizes. Most of us know the sew on kind, but there is also the stick on type (which all these are). Let me warn you that the stick on type really sticks and is not easy to come off. You can buy it by the yard or in dots and shapes. The box in Diagram 1 is heavy duty 1 1/2" wide Velcro.
Why should Velcro be your best friend? It keeps things right where you need them. In Diagram 2 you see the right end of my Pfaff. I put a strip (actually 2 strips) of white Velcro near the base of the machine. There is a seam in the
 |
| Diagram 2 |
 |
| Diagram 3 |
plastic case, so I split the Velcro in pieces, that way a repair person can open the machine without disturbing my Velcro. Always attach the "Loop" or rough side of the Velcro to the machine. Use the soft side to put on items you use often; the ones you'll be handling. In my case it's my seam ripper and my chalk marker. I put the Velcro on the cap of the seam ripper so if I want to close it, I can still stick it to the machine. My friend Sherry Gary gave me several cute "cupcake" pin cushions and I keep one Velcroed to the top of my machine. It can be removed when I use my travel case. Those are button topped pins in it which are heat proof so you can iron over them without having them melt. If you have a Longarm machine, Velcroing a seam ripper to the side is very useful too.
 |
| Diagram 4 |
Another attachment to my sewing machine are my little yellow thread scissors. I lost 2 pair to the trash can I keep under my sewing table before I decided to do something about it. I took one of those expandable key thingies and attached it to my pedal cord. The back of it has a slip on clamp. It stretches well beyond the needle area of my machine. Have had the same pair now for 6 years! (Diagram 4) You'll notice on the right side of the picture above the needle is a 3M strip. It's actually the Loop side of a 3M picture hanger strip. More on that later. You can also see an attachable light in that picture. The light came with a permanent stick on disk that you slip the light into. After my previous Pfaff was laid to rest, I realized I couldn't remove the disk to put it on my new machine. I was able to buy just the seating disk separately for the new machine. Instead of using their stickem' I used a 3M strip you use for the 3M hooks. Now if I get a new machine I can remove it easily. I also use the 3M hooks to hang my large rulers on the side of my cutting table.
Took a class with John Flynn a few years ago to make a Winding Ways wall hanging. Lots of curves to sew. He handed us an Orange Stick to use as a stiletto instead of a (Diagram 5)
 |
| Diagram 5 |
metal one. For those who are very young, an Orange Stick is what is used to push back your cuticle. I went into CVS and asked for an Orange stick and the gal took me to the food section. I bought a package at a Sally Hansen Beauty Store. The reason they are better than a metal stiletto is that the wood grabs the fabric and won't puncture it like a metal point will.
 |
| Diagram 6 |
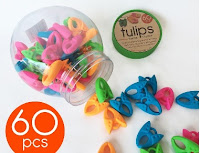
Recently I purchased some Tulip Clamps on-line. They're for holding the thread on your bobbins so they don't unravel. Doesn't matter the size of the bobbin, they fit all. I keep bobbins of different colors in my applique bag, so I bought a dozen of these. They come with a chain, so the bobbins all stay together. I loved them so much I bought 60 more so I could share them with friends. These I bought from Amazon; think Nancy's Notions carrys them as well.
 |
| Diagram 7 |
When I started my Longarm business I liked using Superior Thread's Bottom Line bobbin thread. It comes in spools, cones and pre-wound bobbins. It's very fine and on a standard bobbin you can wind about 92 yards. Yes, I actually wound and then pulled off all the thread to measure it. It was great that my Longarm and my old Pfaff used the same size bobbin; I could use the metal Longarm bobbins in the Pfaff but not the plastic Pfaff in the Longarm. My new Pfaff has the larger bobbin (M size). So I'm using up all my old plastic bobbins for appliqueing. The Bottom Line thread is so fine that it disappears when appliqueing.
 |
| Diagram 8 |
Don't know about you, but I have a hard time seeing that little slot on the clear plastic bobbins that you put your thread through to start the winding process. Not only that, with the drop in bobbins on the Pfaff you need to have the word Pfaff facing up. That's hard to see also. To make it easy on both accounts, I put a dot of red fingernail polish next to the slot on the side that goes up. Now I can find the slot and know which way is up in just a glance. (Diagram 8)
 |
| Diagram 9 |
My next "gadget" are the Loc-Bloc templates/rulers. They come in a lot of different sizes and shapes. I bought a set of 3 for trimming Half Square Triangles (Diagram 9) and a set of 2 sizes for Flying Geese (Diagram 10). They have a grove etched on the bottom side that pushes against your seam(s) and keeps it in place while you trim. Never do I miss getting a sharp corner on my squares - having that diagonal exactly at the corner. On the flying geese I always have that needed 1/4" seam allowance at the top.
 |
| Diagram 10 |
You'll note that I have them on a small green cutting mat that's on top of my large table top cutting mat. I do this for a number of reasons. First, it's easy to turn the small mat rather than the fabric so you don't dislodge the template. And second, generally when I'm trimming HST or Flying Geese, I making tons of them. Rather than wearing out my large mat in the same area, I'd rather do it on a small mat that can easily be replaced. which I just did. I also use the back side of the mat when I don't need the grid lines, this make the mat last longer - 2 for the price of one!
My next gadget isn't a sewing tool at all, but I have adapted it for sewing. It's a laser light. (Diagram 11) Bought it at Harbor Freight and it's called: Central Machinery Laser Marker. The cost is $5.99. And what do I use it for? One thing about making Half Square Triangles is having to mark that diagonal line on every square! With the laser marker, I don't need to draw the lines anymore. Remember the picture of the 3M "Loop" strip on the front of my Pfaff? (diagram 4). I have it's matching strip on the back of the laser maker and when I need it, I just push it in place. Adjust the light so it shines from corner to corner of my square, move my needle a quarter inch to either side and stitch away. I have to admit it takes a bit of time to get the light adjusted, but when I'm doing dozens of HST, it makes it go so much faster.
 |
| Diagram 11 |
Just a few more things - I promise.
 |
| Diagram 12 |
(Diagram 13) I have a tendency to bend my needles when I'm doing hand sewing/applique work. I discovered by accident Clover's Black Gold Needles. They say right on the back "Does not bend easily". And they don't! My Diablo Valley Quilters friend Julia, picked me up a pack when we were at the guild retreat about 3 years ago. I haven't stopped using them. They are a bit pricey $5.99 for 6, but since they last so long I don't mind. We have a gift exchange and she gave me a lovely Koa wood pin cushion with Clover glass head pins. They're called "Patchwork Fine". (Diagram 12) Bought some more to give as a gift too. They glide easily through all fabric types.
 |
Diagram 13
|
The other Clover product I like is the Flexible Rubber Thimble with metal tip. (Diagram 12) This one has been a life saver for me. My joints have become permanently enlarged with Rheumatoid Arthritis which made me unable to applique for very long. The metal thimbles cut into my joint. Tried leather thimbles with metal tips, but after awhile the glue seam on the leather gave way. These rubber ones come in 3 different sizes, each a different color. So glad my size (large) came in yellow! There's a hole in the cardboard so you can test which size is best for you. Have them in every sewing case and near my machine. Keep buying them for fear they'll stop making them! The metal tip is dimpled on top to grab your needle. Really can't say enough good things about them.
(Diagram 14) One last thing, forceps. Yes, forceps. I have two different sizes. They come in handy when you only have a bit of a needle showing after pushing it through some dense fabric. Grab and pull. I've even pulled thread out with it when there was just a tiny piece showing. They're good too if you're having a hard time hanging onto a needle while trying to put it in your machine. Bought mine at Pacific International Quilt Festival at that booth with all the odd tools.
 |
| Diagram 14 |


No comments:
Post a Comment